Saturday 22 April 2017

Blood on the Altar


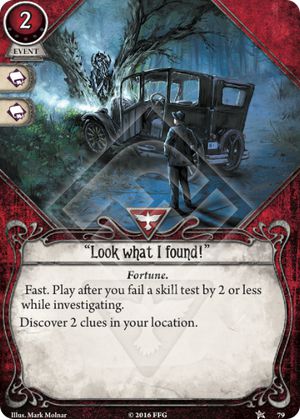
Hello Dear Readers! After the Easter break we’re going back to business. Fantasy Flight Games doesn’t give me too much of a breathing room, releasing Mythos Pack very quickly. I have very little time to test new cards, not to mention writing posts about something different than the newly expanded card pool.

This time we got the highly awaited permanent talents. You can read some general points about them in one of my previous posts. Now, however, we put our fingers on all of them and could finally see how they work in a real game, not only theorize about them.

Designers have created five very distinct talents, each granting bonus in a unique way. They also seem to follow a pattern – each boosts two skills, one of which can also be boosted by the non-permanent Talent of the same class. Talents differ greatly in strength and character. Some of them are more situational, some more consistent etc. Based on my observations, I have made the following ranking (from the strongest to the weakest).


Guardian card has won the competition by a very small margin. It has couple of advantages, all adding together to a great combined effect. 

First of all, it boosts a great pair of skills. Combat and Intellect are the most commonly tested skills, so increasing them comes in very handy. It’s also worth noting, Combat is the most important skill from the perspective of a Guardian character, and therefore investing in Keen Eye allows us to free a spot in the deck by dodging Physical Training.

Secondly, it has a great cost-benefit ratio, provided we can cleverly plan for it. It boosts consecutive skill checks, helping to deal with a problematic enemy or a nasty location.

Both Guardians should be able to reap the benefit of the card. While Roland usually investigates bit more, Zoey has more resources to be able to pay the activation cost.


It is another very strong talent, almost on par with Keen Eye. Its most obvious strength is the cost-benefit ratio – a boost of two for a mere one resource. 

It is not the end of its advantages, though. One must also notice a great choice for the skill pair it increases. Each Seeker is more interested in one skill of the pair. Daisy will be very happy to find a way to reliable boost her Will for spellcasting. We can expect more spells-heavy builds for her to arrive soon. Rex, having a very strong way to boost his Intellect in order to keep investigating at 2+, might finally be free to look for alternative builds to the Scavenging-based. Maybe also a Spell-based one? I would personally try to give him Leo, to investigate even more times per turn. Another card coming to my mind is Opportunist – not only nicely fitting the idea of passing by 2 or more, but also staying in your hand, ensuring Higher Education will be usable.

Higher education is a very thematic card, too. Seekers are naturally inclined to card-drawing; hence a hand full of cards sounds like an interesting requirement. Not to find yourself unable to activate its ability, you should not only plan ahead during the game (spending an action on getting an extra card, if needed, or waiting with playing particular assets), but also stock on card-drawing cards.


Survivor card starts the list of “Tier 2” talents. It follows the pattern of the talent cards from the core set as it boosts the skill by one per each resource spent. In fact, if not for the permanent keyword, it is an exact copy of Hard Knocks.

Obviously, just starting in play (and therefore saving deck space, actions, cost and reducing the luck-dependency) is quite an advantage. Still the card does not provide the extraordinary effectiveness of blue or orange talent cards. The skill pair isn’t too useful, neither. While Wendy can put Agility bonus to a good use, the Combat part is less satisfying. Arguably Pete could use either Will (since he already starts with Will of 4 and therefore uses spells quite often) or Lore much more, while for Wendy it’s almost useless. It leads to some suboptimal deck choices, or ditching Scrapper altogether (and Survivors are already low on high level cards to take).


At the first sight the card looks quite well – bonus of 3 for 2 resources seems like an effective way of succeeding test. To evaluate a boost one needs bit more complicated mathematics, though. As outlined in the previous post, not all boosts are equally profitable and with +3 you run at a decent chance to overinvest.

Furthermore, I cannot understand why Agility is chosen to be featured in a green talent again. With the exception of Backstab and a very rare evasion, Rogues do not use it too frequently (in my games at least). Intellect boost was highly anticipated, though, and plays just perfectly. While Rogues have mediocre Intellect, they’ve had no means of helping with the investigation so far. This is the first reliable boost, albeit an expensive one.

Streetwise is obviously stronger for Jenny, who has abundance of resources, than Skidds. But even with him you can pull the talent off, if you pair it with Hot Streak or two.


I was initially very excited about this card. A huge boost at a 0 resource cost helps the costly Mystic decks. I also like the thematic side of the card. However, adding a doom token is a steep price. There are few scenarios, when you’d be willing to do it.

The first one is obvious – just before Agenda advances, as it doesn’t speed up to malevolent plot at all. This might very rare, though, depending on the scenario and not always timed well with your needs. You could try to do it one turn earlier and use the skill 3 times. You could also use it if failing test would mean too much of damage. Lastly, in scenarios, which pose biggest challenge due to other constraints (tough tests, Behind the Veil etc.) and not particularly the doom-enforced time limit.

Unfortunately, all of those circumstances are rather rare, making the card extremely situational. Moreover, even though Combat boost is useful (opening brand new possibilities for both Agnes and Jim), Agnes’ Will is already very high and a whopping +3 bonus won’t be probably worth a doom token.

Maybe we’ll see some cards manipulating the doom tokens on the assets (or providing more benefits for having them, like Marie’s special ability). Until then Blood Pact is rather underpowered.

The talent cards are the highlight of the expansion. However, there are six more cards in the expansion, some of them very useful. Let’s review them in the usual class order.


Prepared for the Worst is yet another strong Guardian card. Guardians definitely hit the jackpot this time. It has multiple benefits over including a level 0 weapon. First off all, once you start exchanging weapons for the stronger variants, you can use it to find the stronger one, effectively adding more copies of costly, high level cards (like Switchblade or Shotgun) at cost of 0 XP. 

Furthermore, it allows you to include only the exact cards you find most useful – if you prefer Machete, you don’t need to stock on .45 Automatics just to have redundancy and vice versa.
Finally, it is much more effective, if drawn once you already have a weapon. It features 2 handy icons (compare with the Agility icon of .45…). The only drawback compared to just putting an additional weapon to your deck is the cost of 1 resource and an action (obviously you might also get super-unlucky and not find any weapon within first 9 cards, but this is highly unlikely).


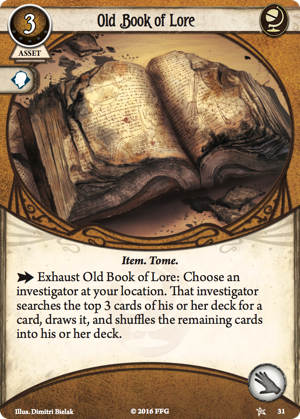
I like Preposterous Sketches, too (it seems we’re getting quite some strong cards in this expansion, huh?). So far a card allowing you to draw another three was only available for a hefty price of 4 experience points.

Obviously there are many advantages of Cryptic Research over the newly released card. It is fast, not only costing 0 actions, but also freely playable when engaged with an enemy. It can be used on another investigator. It does not costs any resources and does not have any requirements to play.1 The last two are trivial, as clues are common and Seekers usually have many resources.

On top of obvious advantages it also provides good synergy with the Higher Education featured in the very same expansion.2

All in all, Preposterous Sketches are very close to the power of a solid 4 level card, so it would be foolish to consider it anything but a great card.


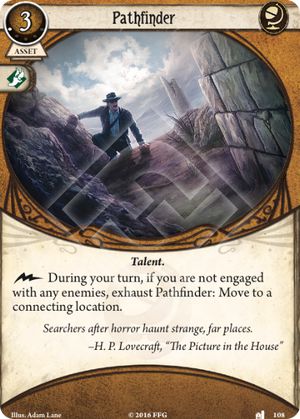
Rogues expand further on their resource theme with Lone Wolf. Please note the timing of the card – it is enough to start the turn alone to gain the benefits, hence you can also use it in a team with a bit of planning (though it obviously absolutely shines in a solo game). It is yet another solid card, building a strong economy and providing very quick return on investment. Unlike Burglary, it doesn’t require you to spend any further actions on it, it’s enough to just keep it in play (and keep to yourself).

While Assets seem to provide the strongest changes to strategy (due to their lasting effects on the game) and you can’t reliably plan the deck strategy on the event/skill cards, they are the much needed icing on the cake and too often get overlooked/underrated. I am glad the designers keep coming with more of them (particularly skills). 


The first one is a Mystic card – Defiance. It builds up on the Mystic theme of manipulating the symbol tokens. It is partially a situational card, as the nastiness of a symbol token varies strongly between scenarios (and even within them), which is partially compensated by the Wild icon on it.

It is hardly an auto-include. Unfortunately to assess its strength you need to know if you get more tokens during the campaign (effectively doubling, or even tripling the chance the effect of the skill will trigger), while due to level 0 it makes most sense to put it in the beginning of the journey. 


Survivor skill is even more situational. Being at -2 at the beginning of the skill check is rather a rare occurrence. And even than the card itself by no means guarantees a success. I would much rather include it in the deck, only if I know how it will be used.

I believe it will be used for fighting by both Survivor characters and Agnes, since an Enemy with 4 strength is already tough enough and they all can use Fire Axe to boost their chances further. Similarly Pete/Agnes can include it, if they anticipate investigating a Shroud 4 location.

I am not entirely sure about the card's interaction with Double or Nothing. If it does work as I'd imagine, though (meaning - you can commit Rise to the occasion, if the doubled difficulty is higher by 2 than your skill), it crates a powerful synergy.

I very much like the thematic side of the card. After all, Survivor archetype reflects an ordinary person faced against terror of the Mythos world, prevailing only due to their resilience, resourcefulness in face of the threat and luck. Thus despite being ordinary and unexceptional they use some inner drive to deal with the challenge.


The new upgraded Emergency Cache does not invoke any strong emotions in me. It is a nice choice for investigators that need more cards (Wendy, Pete, Seekers with the talent, maybe Agnes, as she relies on drawing the assets) or a good pick if you don’t want to ditch any of your cards but want an improvement.

What are your favorite cards? Have you found some interesting interactions? I’m looking forward to hearing your feedback!

All images are courtesy of cardgamedb.com and fantasyflightgames.com

1 Technically speaking, Cryptic Research has the drawback of having no icons, however playing it allows you to get more icons to use at 0 cost. 

2 Maybe the education the talent refers to is an Art School? Would also fit with the Art Student card, huh?

Sunday 9 April 2017

Risk Management

Hello dear readers! I hope you all enjoyed the more abstract post about matching the characters into effective duets! Today we’re going to have another one of the abstract strategy posts with a little twist – a guest writer! As I had mentioned before, I’ve been facing the unspeakable horrors not alone, but with my loyal wife at my side. She is also heavily fascinated with the occult knowledge of Arkham Horror: The Card Game. We have discussed game and my posts together in the past – now she decided to go one step further and co-write a post with me.

We’d like to thank the Polish Arkham Horror community. Lots of the post’s content, as well as the general idea behind it, were inspired by great discussions we’re having there. 

The topic we’d like to bring to your attention this time is risk management. Arkham Horror is a game with a pretty heavy luck element. Therefore, an appropriate approach to the luck-related mechanics is a key to every successful world saving mission. Particularly the part we call “Risk Management”. By this term we mean taking calculated risks, screwing the odds in player’s favor and balancing multiple, mutually exclusive/competitive luck-related goals.

There are two main areas of risk management we’d like to talk about today. The first one if related to the skill tests and the Chaos Bag. The second one involves deck building, particularly the redundancy. 

Let me start with the Chaos Bag.1 I have done some calculations (though it gets really fancy and math-heavy in the next part, just wait for it). Below you can find two tables, the first one is bit tough to read, as it contains chances of succeeding in multiple scenarios (they differ by the modifiers of the symbol tokens)2


Since it is not very easy to decipher, I have also done some averaging, to make some more general observations.


We can draw some general conclusions based on the gathered data. First of all, not each committed icon is equal. Icons that raise our skill value to +2 and +3 have the biggest impact on the pass chance. The average suggests, raising from +1 to +2 yields the most benefit, statistically. The details depend on the modifiers of the symbol tokens, though. If some (or all) tokens only result in -1 modifier, raising your skill to +1 can also help a lot. So please bear it in mind in order to make an educated choice.

Furthermore, another very strong (and applicable in virtually every situation) conclusion can be drawn. If you have two skill checks, two icons/resources to commit and plan/have to succeed in both, committing one to each is vastly superior. For instance, on average the difference is of over 10 percentage points (19 to 30 when comparing to +2’s to +1 and +3's). Same logic applies to spending 4 resources (split of 2 each makes the most sense).

There are occasions when you don't mind failing

Sometimes pumping the test up to +4 (or even higher should any of the symbol tokens provide a higher modifier) obviously makes sense. If failing means a certain scenario failure/death you might consider maximizing your odds. If you have an abundance of resources hoarding them might also be suboptimal. If you’re about to finish the scenario, having spare cards/resources is also not going to help you. There are also other scenarios, like committing “Double or Nothing” (or any Vicious Blow – like card) or attempting a success by two or more (basically use two icons more for the same probability result).

The table can also be used to determine some special cases. The first one is Wendy’s redraw ability. We can use it to check her combined chance of succeeding in a test, either at the first attempt, or a redraw. Almost exactly the same chances apply to the Grotesque Statue, with an important exception – we draw 2 tokens simultaneously – it increases the chances slightly (most importantly can give you a shot at 100% sure draw. Similarly, unless you have any symbol token with -4 or lower modifiers being at +3 all but guarantees a successes). I am using averaged values again and again with the same disclaimer – pay extra attention to the values of symbol tokens.

On other occasions you have to succeed, ideally by 5.

Analysis provides us with few notions. Unsurprisingly, the less chances at passing we have, the more (in percentage, not the percentage points) are they boosted by a redraw. We can put the chart for a better use, than just satisfying our curiosity – we can answer a following dilemma – is it better to commit a card for an icon, or keep it for a redraw? At -1 and 0 the answer is obvious – boosting our skill is a superior choice. Quite the other way around with +2 and higher – keeping a card for a potential redraw should be our best bet. More of a controversial point lies within +1. On average your chances are maxed by a redraw. However, this is just an average case – I can easily find scenarios, where the opposite is true. Hence, once again my advice – check the symbol tokens values – whenever you have a majority of “-2s”, you should go with a boost…

…or shouldn’t you? You must always bear in mind, maximizing the odds of succeeding a single test is only one side of the coin. Each time you gamble on redrawing, you might succeed the first time, effectively saving the card. Final choice should therefore include more factors than just maximizing your chances – you should also take the test’s importance and your card pool into account.

There is one more point, I’d like to raise about chaos tokens – Jim’s ability. As you could have learned from my review, I am a fan of this investigator. Still, his special ability is rather a situational one. How? It does only come in handy, if our modifier is below the skull’s modifier. Otherwise we would have succeeded the test, drawing the skull regardless of using his ability. Therefore to squeeze as much as you can from his ability (keeping it unused puts you at a disadvantage, as you’re basically playing with no ability) you must attempt test regularly at a lower skill value.

I hope you find above points useful and not too complicated. The really complex math starts below, however don’t be too afraid – we’ve already done the most difficult part for you (and we actually enjoyed it, probability is one of the most fun [if not the funniest!] areas of mathematics!).

In order to be successful in your journey through countless horrors and terrors of the Lovecraft's world, you need to create a well-balanced and efficient deck. Many factors need to be considered while creating a deck. Since this post is about risk management, I will focus on the redundancy. Before I delve into details, first let's remind us the general requirements of creating a (typical) deck.

1.                A deck must consist of exactly 33 cards.
2.                You can choose only 30 of them. The other three are character's signature card, character's personal weakness and a random basic weakness.
3.                You can include only up to two copies of the same card (card with the same name)
4.                Investigator's unique deck building requirements, which precisely specify pool of available cards for the investigator.

While creating a deck you also need to keep in mind that you start the game with a hand of five cards drawn from the deck. And to be precise, these are five cards out of 31, not the original 33, as both of your weaknesses don't matter (you simply discard and shuffle them back into the deck if drawn). On top of that, you can mulligan your hand once. You need to keep the second hand – no matter if you like it better than the previous one or not. That's it when it comes to rules.         
     
As mentioned before, in this post I'm going to focus on the redundancy. By redundancy I mean a duplication of critical card(s) with the intention of increasing reliability of the deck.          
     
So many cards to choose from.
And you also have to decide how many copies of them...

What differs AH:TCG from other card games, are limited slots for playing your cards (for example, there is only one ally slot), which often makes drawing additional copies of the same card less useful.  Still we need to include them, just to increase our chances of drawing a particular card. The slot limitation is not the only drawback of having too many copies of the same card. Quite often playing another copy of the same card yields no additional profit. For instance, you have two hand slots and theoretically could play 2 Machetes, but it won't make you any better of a fighter.4

It is crucial to find a sweet spot between having too few copies of the same card (which could result in not drawing it at all, thus making your character far less efficient) and having too many (which would make you commit them for icons only, a clearly inferior use of the card). I made some calculations to get the chances of drawing a particular card in your opening hand, depending on how many copies of the card you have. Please note, all cards that fill the same role in your deck are effectively a copy of the same card. For example – different weapons can be perceived as the same card, since they serve the same purpose. Other example are evading card for characters focused on evading, or assets boosting a particular skill.

TABLE 1
CHANCES OF DRAWING AT LEAST ONE COPY OF A GIVEN CARD ON YOUR OPENING HAND
                             
1 copy                  16 %
2 copies               30 %
3 copies               42%
4 copies               52.5 %
5 copies               61.5 %
6 copies               68 %

  
This little fella luckily doesn't have to be drawn.
             
As we shouldn't forget about the mulligan option, I did some more calculations to get the chances of drawing the particular card in the second hand.

TABLE 2
CHANCES OF DRAWING AT LEAST ONE COPY OF A GIVEN CARD WITHIN 10 FIRST CARDS (EITHER IN THE OPENING HAND OR AFTER A MULLIGAN ASSUMING YOU DREW NONE IN YOUR FIRST HAND)
                       
1 copy                  32.5%
2 copies                55%
3 copies               70.5%
4 copies               81%
5 copies                88%
6 copies               92.5%


Analyzing these numbers you can clearly see, a sweet spot lies between four and five copies of the same card. With four copies you already have a quite decent chance of drawing your card. Fifth copy increases it to an even higher level, making you significantly less luck dependent. Having six copies, however, seems to be already overkill. The difference between having five and six copies is not big. Five copies provide you already with a very high chance of succeeding. Adding one additional copy doesn't help that much, yet blocks your deck slot which could be used for another card.
              
Table 2 alone is very useful if your strategy is based on a hard mulligan (you always mulligan if the required card is not present on your opening hand. You never mulligan, if it is). In such situation you can clearly see your chances and decide how much of a risk are you willing to take. Note, that in a long campaign you will be taking such a risk at the beginning of each scenario.
The above reasoning applies only to the cards that can be added in the deck in more than two copy (cards that don't have the same name but serve the same purpose). But there are quite a few cards that are unique and you won't find another one of the same kind. That leaves you with a possibility of having up to two copies of this card in a deck. Unfortunately a chance of drawing such a card in either your first hand second hand is not really good. If such a card is a crucial element of your deck – it puts you in a tough situation.

My favorite deck digging card.

 There are two ways of mitigating the risk of not drawing your key card within 10 first cards – having a card drawing/card searching options in your deck or having a backup plan.       
       
First strategy is simple – you add cards that let you draw cards from your deck or look for a specific card (Old Book of Lore, Stand Together, Flare). This way you have a decent chance or getting either your key card on the opening hand already, or of getting at least one of these 'drawing' cards (which in result will help you get your key card). „Plan B strategy requires taking in your deck cards that won't make a 'machine' work any better, but that can help you to do your job quite efficiently even if you don't manage to get your key card. These cards should be chosen carefully - they need to be flexible and usable both together with 'plan A' and without.

If hard mulligan isn't your way, you might need few more numbers to decide when it's worth to draw a second hand and when the risk is too high. That's why I prepared another table – table 3 – which depicts the chances of drawing one of your key cards after a mulligan, in case of having drawn exactly one copy in your opening hand:

TABLE 3
CHANCES OF DRAWING A GIVEN CARD AFTER A MULLIGAN
IF YOU HAVE ONE COPY ON YOUR OPENING HAND
  
1 copy                  0% (SURPRISE!)
2 copies               19%
3 copies               32.5%
4 copies               49%
5 copies               60%
6 copies               69%
                            

With these numbers, the perspective of what is a sweet spot might change. Four copies of the same card, that seemed to be good enough in a hard mulligan strategy, might not be good enough if you want to be more flexible. If you have four copies of a card in your deck and you drew one of them in your opening hand, that is overall weak, you're in a quite tough situation. You can either keep the hand to ensure having one of the key cards or decide to mulligan in hope of getting a stronger hand. The second alternative puts you at risk of not drawing any of key cards (roughly a fifty-fifty split). We can also reverse the situation – what if you didn't get the most needed card, but all five cards in your hand are strong? You can keep the hand, reliably hoping to get of the needed cards soon (see later in the table 4).

When you need to make this decision you should keep in mind that you already have some strong cards on your hand and discarding them now would put you on risk of not drawing them any time soon (assuming you have only two copies of most of your cards your chances of drawing the other copy on next five cards is really low). You need to be aware that if you go for a mulligan in such scenario, you risk having a hand full of less useful cards. Depending on how many copies of a key card you have in your deck, you can easily end up without your crucial card and overall weaker hand.

Maybe it would be good to see your chances of drawing your key card (or any other card you care about) on next four cards drawn from your deck during the game (depending on number of copies you have, based on the assumption you got none originally)

TABLE 4
CHANCES OF DRAWING A PARTICULAR CARD 
ON NEXT 4 CARDS FROM YOUR DECK


1 copy                  15%
2 copies                28%
3 copies               39.5%
4 copies               49.5%
5 copie                 58.5%
6 copies               66%
 
First let's analyze these numbers in relation to table 2. Having four copies gives you first 81 % chances of drawing it on your opening hand (hard mulligan option). Next, if you were unlucky, you have almost 50 % chances of getting it on next four cards drawn from your deck. All together you would have to be rather unlucky not to get it quite early in the game. If you can manage without it, the risk might pay off, since chances of getting it soon are not bad. Even higher if you have any drawing mechanisms or just spend actions getting more cards.

Getting two Pathfinders and no weapon in opening hand?
Tough luck!
 I wouldn't recommend having less then four copies if the card is truly crucial for your strategy. Your chances drop significantly if you remove one copy. Having five is a good choice for people who don't want to risk and for these who value flexibility. It comes at a cost of having one less slot for other cards, though, leading to removing submarginal cards from the deck.

I would also like to bring your attention to one more vital factor of redundancy. I focused so far on drawing at least one of the copies of your key card on your hand and assumed that having one only is good enough. But is it really? There are some mechanics in the game that force you to discard cards, both the assets you have already in play or cards you keep in your hand. It's tough to protect against such effects (Ward of Protection is the best solution if the effect comes from encounter deck). This way you can easily lose your precious card and be left with effectively one less copy in the deck. Wouldn't it be better to have more copies in your opening hand in the end? Or at least more copies to draw a replacement soon enough? For sure it is at least worth consideration. You need to decide if you prefer to have this backup copy and be ready for such events or rather take some risks (as pointed out already – additional copy of the same card usually doesn't give you any additional value, can be only committed for icons to the test).

Even your own card can easily hurt your hand, depriving you of key assets.
 
This are still not all the factors you need to consider while deciding on number of copies. There is one more aspect, which can't be easily dismissed (even if it probably won't impact your judgment too strongly). The game (its campaign version, to be exact) sometimes provides you with an option to add a new card to your deck. This card doesn't count towards the investigator's deck size limit. It is entirely plausible, that during a long campaign your deck will grow in size, while the amount of copies of your key card remains the same. This impacts all numbers presented in my tables – the chances of getting the key card are getting lower, obviously. Although in a case of adding just one card, it doesn't make a big difference (below two percentage points) and probably won't impact your decision. The situation changes with addition of more cards. With three more cards in your deck the difference in chances of drawing a particular card is around four percentage points (almost 8% of the original value!) already. In case of having four copies in your deck, your chances suddenly drop from over 50% (52, exactly) to below 50% (48) – meaning you rather WON'T, than will, get your card.

               Let me summarize:
1.                Having between four and five copies gives you the most balances of drawing a crucial card early in the game
2.                Having four copies is a better choice for hard mulligan players
3.                Taking five copies gives more flexibility
4.                The more campaign cards you take into your deck the more the chances drop moving the sweet spot towards five copies.

I strongly believe, having four and five copies of the card are both good choices, particularly in case of assets. If for some reasons you are basing your deck on events, more copies will for sure be needed. The calculation is not as straight forward anymore and delves too deep (pun intended) into the realm of speculations. The opinion about which one is better will vary between investigators and (most importantly) players, depending mostly on their playing style. The most important things to consider while making an educated choice are:

                 How crucial is the card for your strategy?
                 Can you manage without it?
                 Can other players handle your area if you don't get it?
                 How long is the campaign (you will be taking the risk of not drawing your card at the beginning of each scenario)
                 Are there other means of getting your card? (other investigators or yourself having any card drawing options)

A related, yet somehow separate topic are the “combo decks”5. One could consider creating a deck that strongly relies on two particular cards working together. A strong combination of two cards to achieve an exceptionally good effect might be tempting, but let's see how it looks with numbers.
I made an assumption that your combo is based on two cards you have in two copies only. The chances you will draw both of them in your opening hand are around 7.5 % - definitely not good enough to create the whole deck around it and to rely only on this one combo. You can increase the chance up to 10.5 % in your second hand, but only assuming you didn't draw any of them on your first hand (and there is not even 50% chance for such a scenario). Not only the chances of getting the combo in your hand are low even including mulligan option, but also the chance that it will be worth to mulligan is not impressing (only when you drew none of them on the first hand).

Good synergy with Emergency Aid, but don't plan your whole deck around it.

If you draw precisely one of your cards in the opening hand (31.5 % of chance), for sure you shouldn't risk mulligan – you have over 50% chance of drawing none of them on your second hand! If a mulligan is not a good option it means you are forced to play with one card  of your combo only and hope to get the other card soon. The chances of getting a key card on the next 4 cards drawn during the game (assuming you have two copies) are 28% only (table 4).

With such numbers an idea of combo deck based on combining two particular cards doesn't seem reasonable. Some combos are possible, but you shouldn't rely only on them. If you really want to include cards that make a nice combo in your deck, you need to think how to make it work in more combination than 2 particular cards only.

Let's take Rex and Scavenging as an example – you need an item you can keep committing and getting back with Scavenging. Scavenging without this item will be next to useless. But don't include only one item for this purpose (even in two copies it won't be enough) – take Rabbit’s Foot, Flashlight, Strange Solution (all in two copies) and any other card you can think of. This way not only the chance of making the mechanism work grows significantly, but also you can put some of these cards with their original use – play them as an asset and use only another item for committing purposes.

Even in a deck created this way there is still a problem with Scavenging itself– there's no other card you can take that would work similarly to it. Therefore you can have maximum two copies of this card in your deck. How to deal with this problem has been already described earlier – two ways of mitigating the risk of not getting your key card (under table 2).
 
We hope you found our analysis interesting and useful in your everyday gaming! Let us know if you agree with the conclusions and see you all in Dunwich!

1Please note all the calculations are made for the standard difficulty. Some of the points that I’m raising do also apply to other difficulty levels.

2For the purpose of simplicity I assumed Elder Sign to be equal to “0”. It doesn’t change the results too heavily for investigators with positive ES values. One does very rarely make skill checks with negative base value anyway.

3 I like to use a small trick when calculating the odds – it’s much simpler to get the chances of failing. Just a trivia if anyone of you is willing to do some of related math on his own.

4In most of the card games multiple copies of the same card can be successfully used. However FFG seem to build many of the games around making multiple cards unique, which enhances the deckbuilding experience. The committing mechanic is a brilliant way to balance it out for AH:TCG.

5If we stick to the Magic: the Gathering terminology I’ve been using every now and then, one can hardly imagine a pure “combo deck” in Arkham. Classic combo deck either pulls out the combo and wins, or fails to do it before it gets overrun and loses. This doesn’t happen yet in AH:TCG and I kinda can’t imagine such a possibility. The term is used here to indicate decks highly relying on such a combination, key synergy.